Hey makkals,
This post is a part of a multi-part series on WebAssembly. Check out other parts of the series here
At this point we have a good amount of working knowledge in WebAssembly. Its time to create something decent enough to understand more about WebAssembly.
In this post, we’ll build an application that converts colorful images to grayscale without using any libraries.
Here’s a quick preview of the application we’ll build. It takes a colorful image and converts it to grayscale.
You can get the source code of this project from this repository - https://github.com/djhemath/Webassembly-demos/tree/main/grayscale
Idea behind converting image to grayscale
Before starting to write code, let’s first understand the logic behind converting a colored image to a grayscale one.
Every image is comprised of pixels. Each pixels hold a color. Every color can be represented with 4 values:
- R - red
- G - green
- B - blue
- A - alpha / opacity
![]() Image from https://tsumutake.com/photo-quality/chapter1-structure-of-photo
Image from https://tsumutake.com/photo-quality/chapter1-structure-of-photo
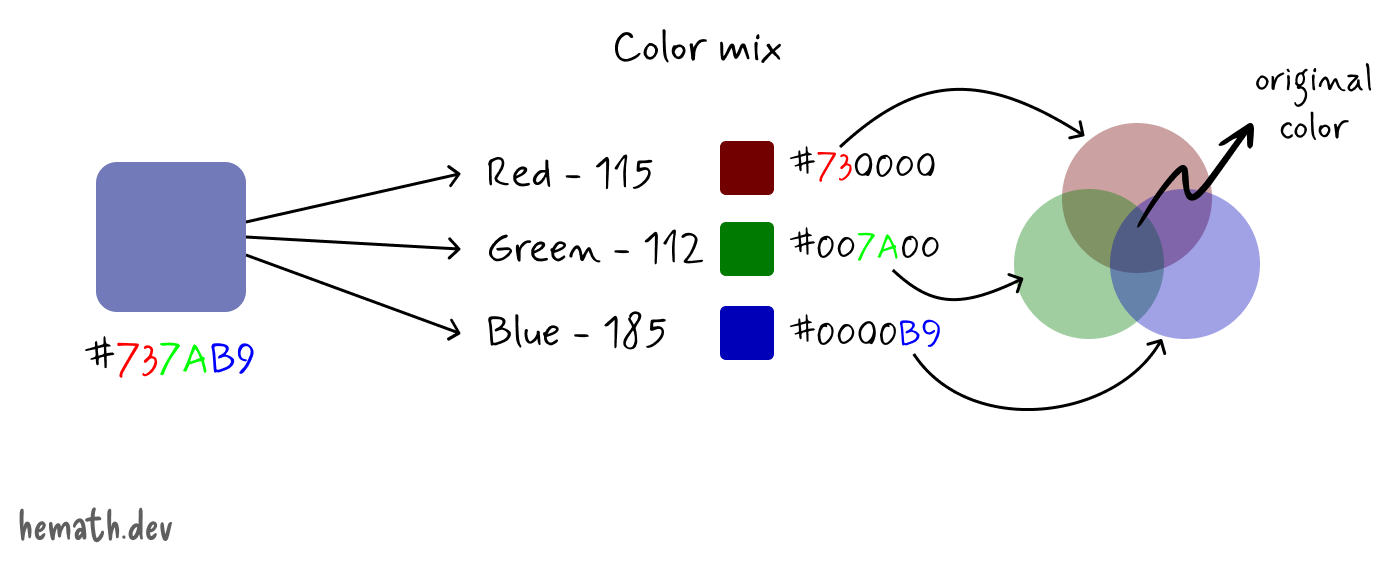
So if we can modify R, G and B values of each and every pixel, we should be able to convert the image into grayscale.
To do that we have to multiply R, G and B with certain values which reduces the luminance.
We are going to split the luminance into 3 parts,
0.299 + 0.587 + 0.114 = 1
Why these specific numbers?
These weights reflect the human eye’s sensitivity to different colors:
- Green (
0.587): The human eye is most sensitive to green light, so it has the highest weight. - Red (
0.299): The eye is less sensitive to red light, so it has a moderate weight. - Blue (
0.114): The eye is least sensitive to blue light, so it has the smallest weight.
So to convert any pixel into a gray we can use the following formula,
gray = (r * 0.299) + (g * 0.587) + (b * 0.114)
Get pixels of an image in JavaScript
The next challenge is to read an image and get pixel data out of it. Luckily we have Canvas in Web. The idea is to draw user-selected image into a canvas and get the canvas image data.
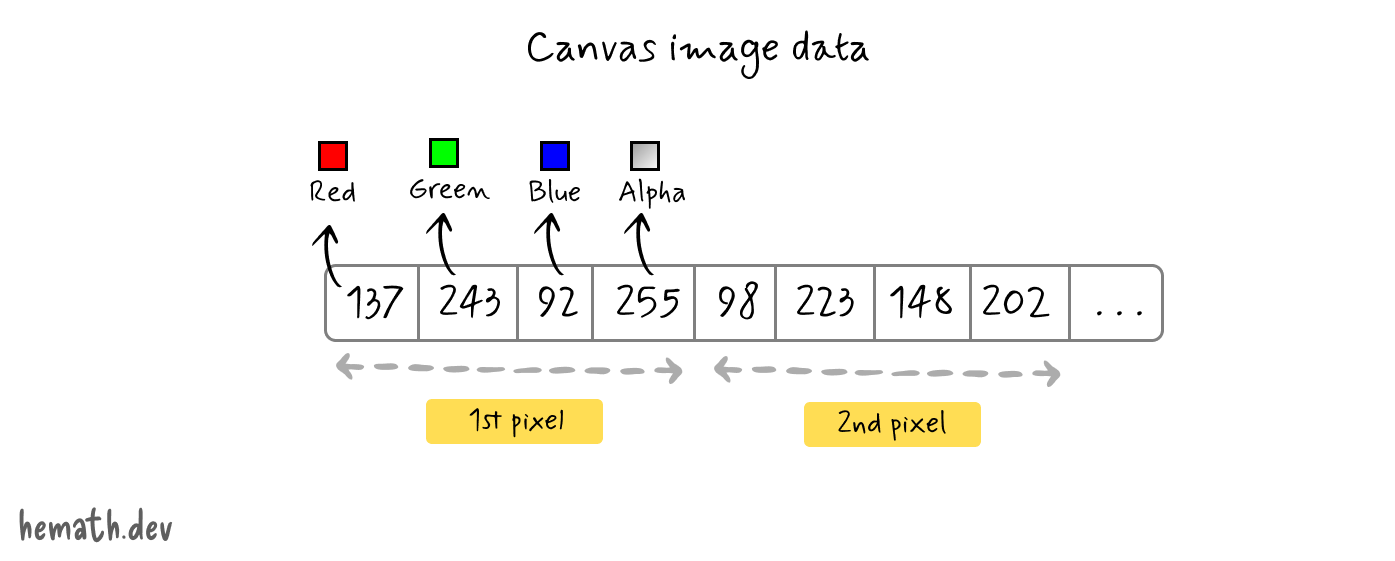
The CanvasRenderingContext2D.getImageData function gives us an one-dimensional unsigned 8-bit integer array.
Since it is an one-dimensional array, data of each pixel takes up 4 spaces in the array.
For example,
[137, 243, 92, 255, 98, 223, 148, ...]
Here the data of
- first pixel is stored in the indices 0, 1, 2 and 3
- second pixel is stored in the indices 4, 5, 6 and 7
- and so far
It is essentially a flat array. So while operating with this array, we mostly iterate 4 elements at a time.
In this array,
- first element represents R
- second element represents G
- third element represents B
- fourth element represents A
To get the image data in JavaScript,
<body>
    <input type="file" id="image" />
    <canvas id="canvas"></canvas>
</body>
const imageInput = document.getElementById('image');
const canvas = document.getElementById('canvas');
const ctx = canvas.getContext('2d');

imageInput.addEventListener('change', (e) => {
    // Get the file from the event object
    const file = e.target.files[0];

    // Instantiate a new FileReader
    const reader = new FileReader();

    // Read the file object as a data URL
    reader.readAsDataURL(file);

    reader.onload = () => {
        // Create an image object
        const image = new Image();

        // Load the result into image
        image.src = reader.result;

        image.onload = () => {

            // Set the width and height of canvas same as the image
            canvas.width = image.width;
            canvas.height = image.height;

            // Draw the image into the canvas
            ctx.drawImage(image, 0, 0);

            // Get the image data
            const imageData = ctx.getImageData(0, 0, canvas.width, canvas.height);

            // Get the pixel array
            const pixels = imageData.data;
        }
    }
});
Sorry for the callback hell, I intentionally kept the code simpler so that we can see the flow from top to bottom at once.
Write logic to convert image into grayscale
Now that we have a formula for the conversion and pixel data, it’s time to write a WebAssembly function that converts each pixel into gray. Let’s create a simple C++ function,
// grayscale.cpp
#include <emscripten.h>
#include <vector>

extern "C" {

  EMSCRIPTEN_KEEPALIVE
  void applyGrayscale(uint8_t* data, int length) {
    for (int i = 0; i < length; i += 4) {
      uint8_t r = data[i];
      uint8_t g = data[i + 1];
      uint8_t b = data[i + 2];

      uint8_t gray = static_cast<uint8_t>(0.299 * r + 0.587 * g + 0.114 * b);

      data[i] = data[i + 1] = data[i + 2] = gray; // Set R, G, B to gray value
    }
  }
}
It’s a simple C++ function that receives unsigned 8-bit integer pointer as an input. It then applies the formula for each and every pixel.
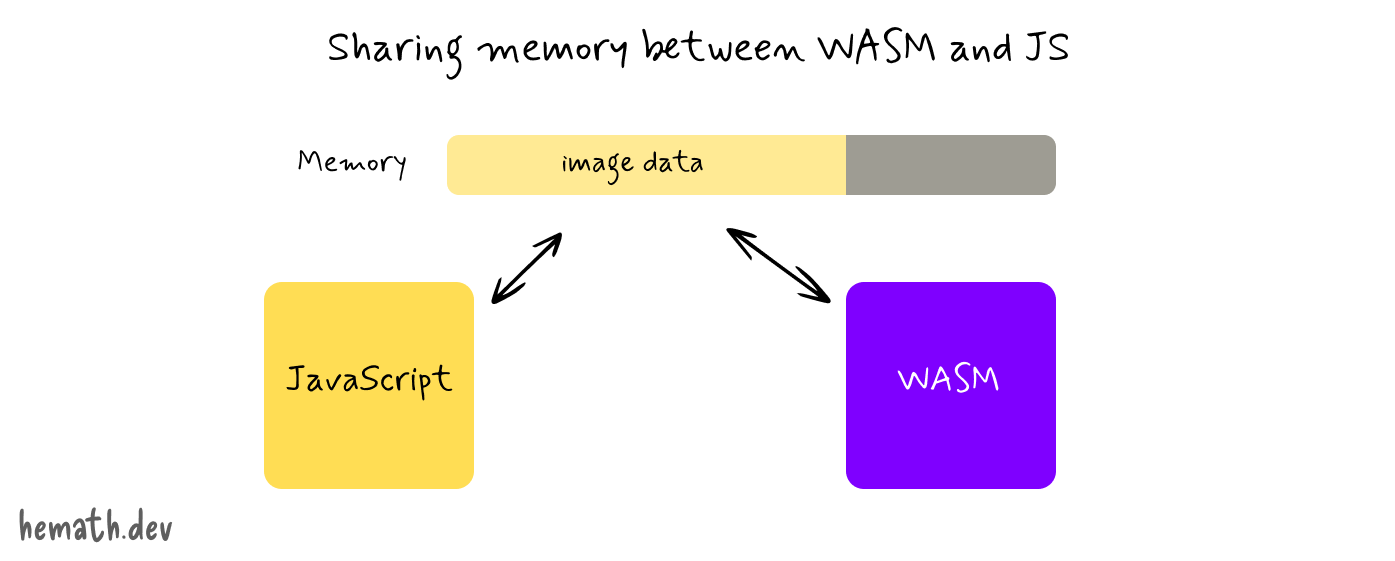
If you look closely enough, this function directly modifies the pointer value instead of returning the modified array.
This is intentional because returning a new array means, we are transmitting data from WASM to JS. And this kind of data transmission is costly and will consumes time. To avoid that we can create a common memory between JavaScript and C++. We will put the image data in the memory and give the pointer to that image data. And the C++ function operates on the data directly.
Now let’s compile the code and generate WASM binary and JavaScript glue-code.
emcc grayscale.cpp -o grayscale.js -O3 -s EXPORTED_FUNCTIONS='["_applyGrayscale", "_malloc", "_free"]' -s EXTRA_EXPORTED_RUNTIME_METHODS='["ccall", "cwrap"]' -s ALLOW_MEMORY_GROWTH=1
This will generate two files,
- grayscale.wasm - The actual WASM binary
- grayscale.js - The JS glue-code
Use the generated WASM with JavaScript
For the next parts you need to be a bit familiar with:
First of all we have to create and set the image data in the WASM memory. We can do that by using _malloc function and HEAP8 object.
<!-- Include the glue-code -->

<script src="./grayscale.js"></script>
// Create the required memory
const imageDataPointer = Module._malloc(pixles.length * pixles.BYTES_PER_ELEMENT);

// Set the pixels array in the memory
Module.HEAP8.set(pixles, imageDataPointer / input.BYTES_PER_ELEMENT);
Here, Module._malloc creates required amount of memory. BYTES_PER_ELEMENT gives how much bytes a single element in the pixels array takes. By multiplying the length of pixels array the byte per element, we get the overall memory size required for an image.
In our case, the pixels array is a 8-bit integer array. Each element takes 8 bits or 1 byte of memory. So if the pixels array has 1000 elements, the memory required is 1000 bytes.
Remember each pixel is represented by 4 integers. It means, each pixel takes up 4 bytes of memory.
So if an image contains 25 x 25 pixels, it means,
25 x 25 = 125 pixels in total
125 x 4 = 500 elements in the array
500 x 1 = 500 bytes
After allocating the space and setting the data, we can call the applyGrayscale function defined in WASM.
// Wrap the JS around WASM function
const applyGrayscale = Module.cwrap("applyGrayscale", null, ["number", "number"]);

// Call the WASM function with required data
applyGrayscale(imageDataPointer, pixels.length);
After the WASM function completed it’s execution, the memory will now be changed.
To get the modified data from the memory, we have to get the buffer from HEAP8 and construct an un-signed 8-bit integer array.
// Get the modified data from the memory
const grayPixels = new Uint8Array(Module.HEAP8.buffer, imageDataPointer, pixels.length);

// Set the modified data to the original pixels array
pixels.set(grayPixels);
After all of this, we MUST clear the memory that we allocated. Remember, even though JavaScript has a garbage collector, C++ doesn’t!
Module._free(imageDataPointer);
Putting it all together
So far we tackled each and every piece separately. Let’s now put all these pieces together.
<body>
    <input type="file" id="image" />
    <button style="visibility: hidden;" disabled id="js">JS</button>
    <button disabled id="wasm">WASM</button>

    <canvas id="canvas"></canvas>

    <script src="./grayscale.js"></script>
    <script>
        const imageInput = document.getElementById('image');
        const canvas = document.getElementById('canvas');
        const wasmBtn = document.getElementById('wasm');

        const ctx = canvas.getContext('2d');

        imageInput.addEventListener('change', (e) => {
            // Get the file from the event object
            const file = e.target.files[0];

            // Instantiate a new FileReader
            const reader = new FileReader();

            // Read the file object as a data URL
            reader.readAsDataURL(file);

            reader.onload = () => {
                // Create an image object
                const image = new Image();

                // Load the result into image
                image.src = reader.result;

                image.onload = () => {

                    // Set the width and height of canvas same as the image
                    canvas.width = image.width;
                    canvas.height = image.height;

                    // Draw the image into the canvas
                    ctx.drawImage(image, 0, 0);

                    // Get the image data
                    const imageData = ctx.getImageData(0, 0, canvas.width, canvas.height);

                    // Get the pixel array
                    const pixels = imageData.data;

                    wasmBtn.addEventListener('click', () => {
                        // Create the required memory
                        const imageDataPointer = Module._malloc(pixels.length * pixels.BYTES_PER_ELEMENT);

                        // Set the pixels array in the memory
                        Module.HEAP8.set(pixels, imageDataPointer / pixels.BYTES_PER_ELEMENT);

                        // Wrap the JS around WASM function
                        const applyGrayscale = Module.cwrap("applyGrayscale", null, ["number", "number"]);

                        // Call the WASM function with required data
                        applyGrayscale(imageDataPointer, pixels.length);

                        // Get the modified data from the memory
                        const grayPixels = new Uint8Array(Module.HEAP8.buffer, imageDataPointer, pixels.length);

                        // Set the modified data to the original pixels array
                        pixels.set(grayPixels);

                        // De-allocate the memory
                        Module._free(imageDataPointer);

                        // Update the canvas
                        ctx.putImageData(imageData, 0, 0);
                    });
                };
            };
        });
    </script>
</body>
Conclusion
Alright, finally we created a functioning application in WebAssembly. If you look closely, we only migrated the computationally intensive part into C++ and kept other UI related activities within JavaScript. This is a good example of WebAssembly and JavaScript working together.
You can get the source code of this project from this repository - https://github.com/djhemath/Webassembly-demos/tree/main/grayscale
Even though we have built an application for a real-life use case, its still a small project. There is a ton of things we can do with WebAssembly. We can use libraries written in other languages within browsers too.
In the next post, we’ll explore how to use the famous FFmpeg library (written in C++) to create a video-to-GIF converter. Stay tuned!